If there’s one tool that I think every new digital artist should know, it’s how to use clipping layers. Clipping layers are what separates the savages from the civilized artists. In this tutorial I hope to teach you all about them.
Usually when you start out drawing digitally you try to do everything in one layer, and very quickly you realize how much of a nightmare that is. Attempting to shade anything is a mess because you keep going outside the borders and painting over other stuff. It’s very hard to keep any semblance of order.
So, then you have the idea of separating each different thing into its own layer – the skin layer, the shirt layer, hair layer, etc – and then you just lock those layers and shade away. Problem solved, right? Well… It works okay, but there’s still a number of problems you’ll bump into, and these can all be avoided if you use clipping layers.
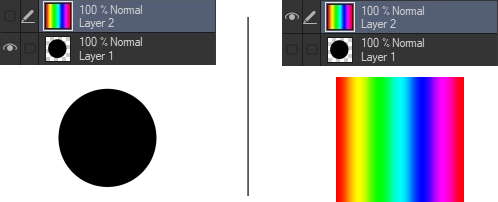
Let’s do a quick example. Say you have this black circle on a layer 1, and this rainbow gradient on layer 2.
You select the rainbow layer and turn it into a clipping layer. (This is where the option is in Clip Studio. It might be somewhere else in other programs. Make sure to do a quick look up!)
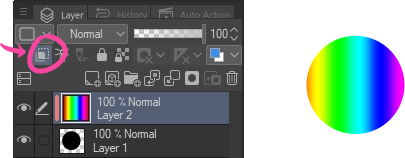
A curious thing happened. Now it looks as if the black circle became rainbow colored. How come?
What happened is that the pixels from the rainbow layer became only visible in pixels where the black circle is visible – the area in which it overlaps the base layer – and that makes it look as if the circle is rainbow colored.
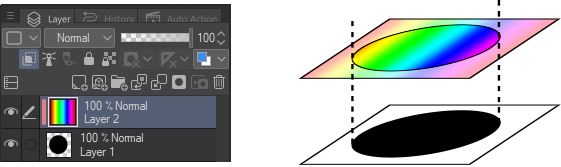
Now, you might be asking yourself, why is this useful? For a ton of things, actually! Say for example we want to change the shape from a circle into a square. If this were all just one layer then you’d have to change the shape, and then redo the rainbow pattern. But with clipping layers, you can just change the shape on layer 1 and you’re done.
In another more common real life scenario, say that you don’t want to mix the layer where your shading is with the layer where your highlights are – a common situation. You simply put these in 2 different layers, both clipped to the skin layer, and out never have to worry about them going “outside the lines” or interfering with each other.
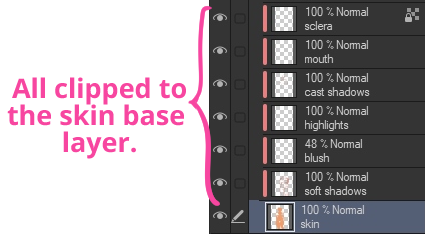
It’s the backbone of layer organization.
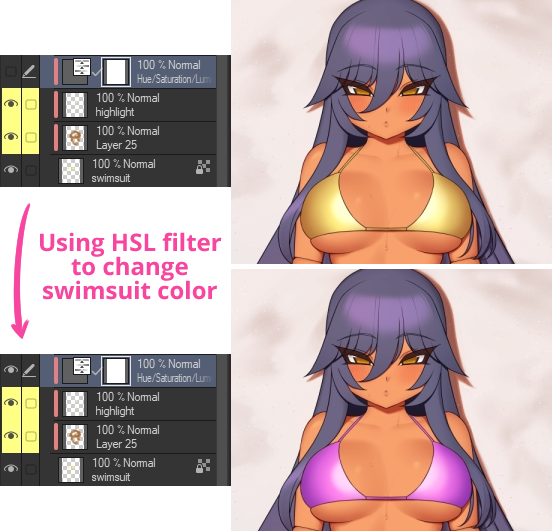
Another example: say you want to apply a filter or a texture over a group of layers. This can also be done very easily as a clipping layer.
Another great use is for coloring lineart. Coloring lineart will make your art look softer and nicer, and it’s more convenient to do it in clipped layers where it’s easy to edit.
And that’s about it. It’s a simple universal feature that’s very powerful and useful. I could list more examples of things you can do with it but I think these cover most of the major use cases. I hope that was helpful, and if you have any questions, let me know in the comments. :>